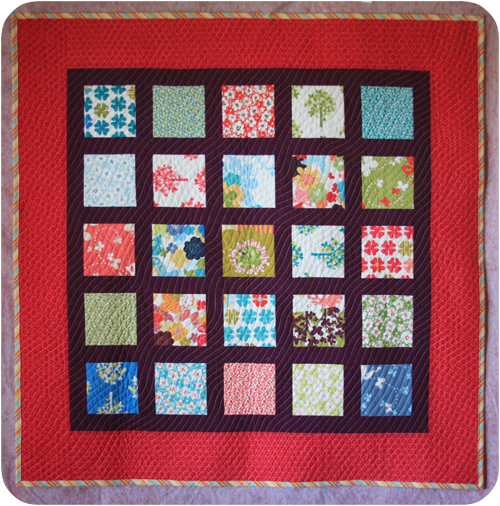
I know you’ve been waiting a long time for this. Remember two (okay three) weeks ago when I teased you with the promise of an in-depth instruction-filled post on my favorite quilting technique. Well, I’m finally delivering. Sorry for the delay.
I give you Yemi’s Quilt Front. This lovely was made for a very special little lady. The squares are actually from a Charm Pack for a fabric line I cannot remember. The Sashing is a Kona color I can’t remember and the border and binding are from my stash.
That was way helpful, right…
As you can see, the quilting creates ripples across the quilt. Here’s the back which gives a better view of the detail.
Can you see the waves? I LOVE this quilting technique. It is super easy to do and very forgiving. Also, did I mention that it is quick? Yes…super quick. Probably harder to do on a large quilt, but I haven’t attempted that yet. There are no crossing seams, so no major puckers. And I also like that it can look different every time.
Wanna try it out for yourself? Here’s a quick little diagram set of instructions to get you started. You will absolutely need a walking foot for your machine. Otherwise, just baste as best you can and then start your engine.
The first line of stitching should meander in large waves across the middle-ish of the quilt. I would advise you to make large swooping waves instead of short pointy waves. It is a little easier to follow the big swoopy waves in the following steps.
I also find it easier to hold the fabric a little farther away from the needle and a little wider than normal. It allows me to get more perspective on the size of my waves.
Here’s a little illustration of what I mean:
Clear as mud…ok, good. Here’s step two:
Now you place your walking foot the desired distance away from the first stitching line. Now stitch an echo of your first stitching line using your walking foot as a guide for distance. In this quilt, I believe I used the outside edge of my quilting foot. Its ok if you get a little closer or farther away. You have some wiggle room. Just try to keep your quilting smooth and even.
Continue echo quilting each previous line until you reach the quilt edge. Rotate 180 degrees and start echoing from the original quilting line back in step one. Continue echo quilting each previous line until you reach the quilt edge. Here’s what it should look like all finished up:
Notice how it isn’t perfect. That’s why I like it. It becomes very organic. No harsh edges, just smooth and supple. Almost reminds me of striations in the soil or in a rock.
It adds some great texture to a quilt without overpowering the fabrics.
The variations are endless. Make your stitching farther apart or closer together. Maybe put an island in the waves and let them roll away. (P.S. I am sure someone has done this type of quilting before, I just wasn’t sure what it is called. I don’t claim to have invented this type of quilting…just sharing my latest quilting adventure…end disclaimer).
Give it a try, and let me know how it goes.


Comments on: "The Long Awaited Waves Quilting Post" (4)
This it totally absolutely utterly fabulous!
Thank You my friend!
Thank you so much for this! I’m piecing together a quilt front with very bold colors and all straight lines. I wanted to quilt it in a way that will “soften” it up a bit and I think this technique is perfect- especially considering I’m still pretty terrified of FMQ and very much attached to my walking foot!
That sounds like a wonderful idea!